2)Submit transaction details
Required transaction details
All required claim or payment attributes such as practice, patient and charges are handled within the self-contained UI. Partners can also handle success, error and cancel events with an onSuccess, onError and onCancel callbacks. Webhooks are recommended for asynchronous responses post submission.
In the most basic mode, partners will be directed to the Tyro Health transaction SDK which prompts the user to enter all the required attributes to process the claim. In this mode, users are required to input all attributes of a transaction (even if those details have already been entered in the partners system). Once the transaction has been completed, the status and payment reconciliation references are returned which can be recorded in your system.
By default, the SDK will prompt users to enter all the required attributes. However you have the option of prepPopulating some or all attributes required from your system with the Tyro Health Online UI acting as a simple validation and error handling.
You can pre-populate some or all attributes required to process a transaction.
For Tyro Health Online Payments(Virtual Terminal) transactions, attributes include:
- platform : set to "virtual-terminal"
- chargeAmount : amount to be charged
- invoiceReference : a unique provider defined invoice reference, such as practice management system transaction number or an external accounting system invoice number
- paymentMethod : either a manual entry of payment card (MOTO), SMS payment request or payment request web link
- patient{mobile} : number for SMS payment requests
- providerNumber : to automatically set practice and provider details and settlement instructions
For Funder claims and transactions, common attributes include:
- platform : set to "funder"
- funder : HICAPS, Medicare, DVA, Patient Funded, icare, WorkCover Queensland, etc
- invoiceReference : a unique provider defined invoice reference, such as practice management system transaction number or an external accounting system invoice number
- providerNumber : usually a Medicare issued provider number
- patient details : fist and last name, date of birth
- items details : item codes, service dates and prices
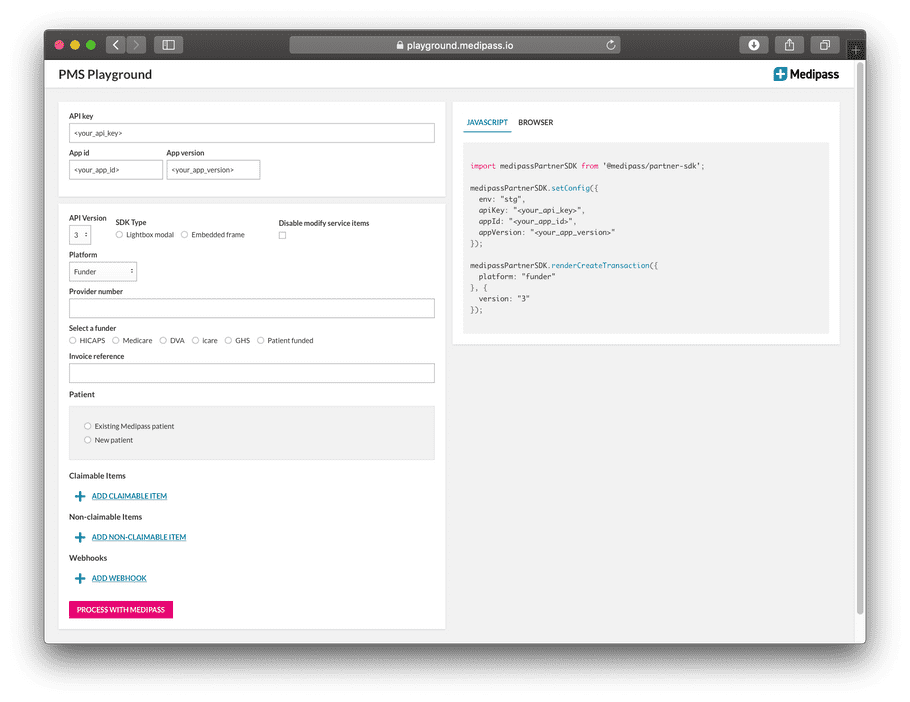
Transaction examples and PMS Playground
Transaction payload options differ between funders. To simplify your development experience, we've created a "PMS Playground" to interactively generate sample transaction payloads. We expose options available for every funder and for Virtual Terminal transactions with the corresponding JSON payload or URL.
Access the Playground https://playground.medipass.io/ .

Note: A valid API key and App ID is required. Playground is set to a non-production environment.
Set a patient refId
A patient refId is your own unique reference to the patient for matching. Tyro Health Online will use the refId to store patient details.
The first time a transaction is created for a patient, you should send all elements of the patient object.
On subsequent transactions you can send only the refId and we will pre-populate patient information. However, if you provide other patient attributes (like first name, last name, etc), we will update those against the patient's refId.
Example
The first time you create a transaction, your patient could look like this:
medipassSDK.renderCreateTransaction({
  // ...
  patient: {
    refId: '0001',
    firstName: 'Claudia',
    lastName: 'Connor',
    dob: '1996-08-20',
  },
  // ...
});
On subsequent transactions, your patient could look like this:
medipassSDK.renderCreateTransaction({
  // ...
  patient: {
    refId: '0001',
  },
  // ...
});
However, you can still provide the original patient values, and the patient will be updated only when necessary (when one of the patient values change).
Set transaction callbacks
Callbacks are functions that you can provide to a method in the SDK which will give you feedback when an event occurs.
They can be useful when you want to record data & attributes at a particular stage of a transaction.
You can provide a set of callback events to the second parameter of renderCreateTransaction.
A list of callbacks provided can be viewed in the funder specific callback sections.
Example
import medipassSDK from '@medipass/partner-sdk';

medipassSDK.renderCreateTransaction(
  {
    // ... transaction attributes
  },
  {
    onSuccess: function(transaction) {
      console.log(transaction);
      // -> { _id: '123', created: '2020-06-22T23:18:30.329', items: [...], claims: [...], ... }
    },
    onError: function(error) {
      console.log(error);
      // -> { message: 'An error occurred.' }
    },
    onCancel: function() {
      console.log('Transaction cancelled.');
    },
    onCloseModal: function({ transaction, error, status }) {
      if (status === 'success') {
        console.log(transaction);
        // -> { _id: '123', created: '2020-06-22T23:18:30.329', items: [...], claims: [...], ... }
      } else if (status === 'error') {
        console.log(error);
        // -> { message: 'An error occurred.' }
      } else if (status === 'cancelled') {
        console.log('Transaction cancelled.');
      }
    },
    onTransactionCreated: function(transaction) {
      console.log('Transaction created', transaction);
    },
    onTransactionUpdated: function(transaction) {
      console.log('Transaction updated', transaction);
    },
  }
);
Set transaction webhooks
Whilst the majority of transactions are processed in real-time with an immediate outcome, some transaction outcomes may be delayed by hours or days. For example, some Medicare transactions may require manual review with an outcome 2-3 days post submission. Likewise, a Virtual Terminal transaction with a patient SMS request may take minutes or hours for action.
You can get transaction updates in two ways:
- Set a unique transaction webhook; or
- Periodically poll the transaction status using the Get Business Transaction method deatiled below:
We recommend using the webhook method.
A list of available webhooks can be viewed in the funder-specific webhook sections.
Webhook Example
To set a webhook, use the webhooks attribute and provide:
- URL (usually transaction specific)
- webhook event Medicare example
- method: POST/GET/PUT/DELETE
- Any required headers (your transaction specific ID or authentication header could be set here)
medipassTransactionSDK.renderCreateTransaction({
  // ...
  webhooks: [
    {
      url: 'https://your-site.com/transactions/your-transactionId/success',
      event: 'healthFundApprovedInvoice',
      method: 'POST',
      headers: { sessionKey: 'Hello world' }
    },
    {
      url: 'https://your-site.com/transactions/your-transactionId/failure',
      event: 'healthFundRejectedInvoice',
      method: 'POST',
      headers: { sessionKey: 'Hello world' }
    }
  ]
  // ...
})
Example Usage of getBusinessTransaction
Parameters
-
transactionId(string, required): The unique identifier for the transaction. -
businessId(string, optional): Override the business ID if different from the one attached to the API Key.
Example Usage of getBusinessTransaction
medipassTransactionSDK.transactions.getBusinessTransaction({
  transactionId: '123'
});
Sample transactions
To get you started quickly click on the funder or terminal payment type below to see a sample transaction: